Beyond making everything prettier, it must also better the general player experience. Be it by guiding the eyes of the viewer to important points, giving more readability of what's happening or even by helping tell a story through little details. Above all, textures are a great way of visual communication.
Style and hand-painting
Painting textures on Groma
There are a lot of ways to do texturing, each with its own pros and cons. For Skydome we chose to go with a technic called hand-painting. It makes use of digital painting to simulate the visual of different surfaces and materials. In texturing we use the low poly model, with all the support maps we discussed last week. Mainly the UV, ambient occlusion and normal map.
Map Navigation
There’s really nothing in the way stopping people from doing manually what is already in some maps. But, since they already exist, they can really make things progress a lot faster by serving as a guide or base for the production. Saving a lot of work hours.
![]() Ambient occlusion map has a lot of information on shadows
Ambient occlusion map has a lot of information on shadows
After having applied the maps it’s time to start thinking about the base for all the colors. Before that, we must first understand what is what inside the UV map.
![]()
Can you find Groma’s head?
Some parts like the head and hands are somewhat easier to identify (upper left if you haven’t), but on the other side, small parts and accessories may be really hard to. After knowing what each part of the map represents, it’s time to digitally paint the base color on the UV map.![]()
Base colors painted on the UV and then applied to the model.
The objective on this step is to identify all the different objects and materials. Always considering the champion’s concept art, as to mitigate any coloring error before we go into the hard work that is rendering.
Rendering
It’s in this step that all the little details are meticulously painted and the texture is finalized, and then tested in the game environment. If necessary, there could be more stuff to be painted on the maps themselves, such as volume, height, shadows and metallic reflections or any other material characteristic.
![]() The whole texturing process.
The whole texturing process.
As this step is really hard work and it takes a lot of time, it’s important to know which parts of the model will need a more detailed texture, and with it, more time to finish. It’s also always good to consider the in-game camera angle to see which parts are shown the most and stuff like that. Nobody likes spending a lot of time on something that’s not needed or even seen right?
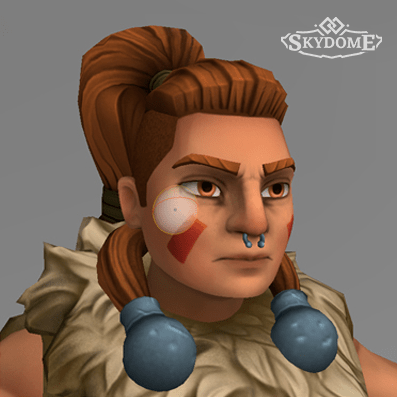
It’s also important to focus on parts that are important for the character, such as their face or any other characteristic.
![]() Face details from base color to finalized.
Face details from base color to finalized.
The big test
After the rendering is done, it’s time to test it in-game!
The lighting as well as other objects textures might influence the way we perceive the colors on the champions texture. So there’s a chance that a texture that does work really well by itself might not be the best fit when inside the whole set. If anything is not to our liking we can do some adjustments to the saturation, tone value or even to add or remove some of the details.
The objective is to guarantee that the new texture will work with all the other elements. Achieving its role, both technically as well as visually.
![]() Model with the finalized texture applied inside Skydome.
Model with the finalized texture applied inside Skydome.
Well, that’s basically it! This process, just like the one before can be somewhat technical. We hope you liked it and if you have any questions, you already know it: leave us a comment below!
See you next time!


So the arms are Popeye~ish?
That's a way of saying Jetcutter.
We have only shown one tribe so far, the Forgeborn — and at least with them we are going with that style. What do you think of it?
Cheers
This comment is currently awaiting admin approval, join now to view.